
As autumn winds down and we retreat indoors from the cold, we’re already making plans for next year’s garden. That’s why we caught up with Thomas Proux, the LookDev artist and digital landscaper behind the highly stylized vegetation piece, Bonsai Garden.
In this blog, he shares some key insights on working in 3D and tips for growing into a seasoned artist.
Thomas’s Compositing Breakdown of Bonsai Garden
Let’s start with an introduction. Take it away, Thomas!
Hi there, I’m Thomas. I grew up in France surrounded by amazing art. Comic books and cartoons led me to love stylized work. After high school, I decided to pursue my education in the United States with the goal of one day joining one of my dream studios: Disney, Dreamworks, or Pixar.
I first completed a 2D animation degree in 2018, and then went to Gnomon where I graduated with a 3D generalist bachelor’s degree. I am now starting my career working as a lighter/compositor at DreamWorks Animation – living the dream!

Thomas Proux
Thomas Proux’s The Forest Legacy,
based on Concept Art by Bryan Van Der Linden
What drew you to 3D art?
I cannot recall a specific instance that drew me to work in 3D. With my passion for animated TV shows and movies, it just naturally became my career choice. The goal was always to tell stories, but there’s only so much you can put in a single frame; I felt the need to turn to motion pictures. Plus I can’t draw or paint to save my life, so I decided to base my work on other artists’ concept art, while always making sure to give them credit.
How long have you been using SpeedTree?
I first used SpeedTree back while working on my first 3D project in fall 2019. It was for the “Intro to Maya” class at Gnomon where we had to recreate an indoor room from concept art. The piece I had picked contained a tree in the middle of a house, as part of the structure. With my very limited 3D skills at the time, I sought out the most effective way to create that trunk – and since sculpting was not an option, SpeedTree became the obvious choice.
How does it fit into your workflow?
SpeedTree made its way into my regular workflow about a year later for my first Demo Reel piece. Since then, it’s what I use whenever I have to approach some sort of foliage, bushes, or trees. Over time, I built a little SpeedTree library from which, more often than not, I can pick a base to work from. Lately, the Wind Wizard has been my favorite feature. It enables me to give more life to my pieces.
Tell us about your process when approaching a new project.
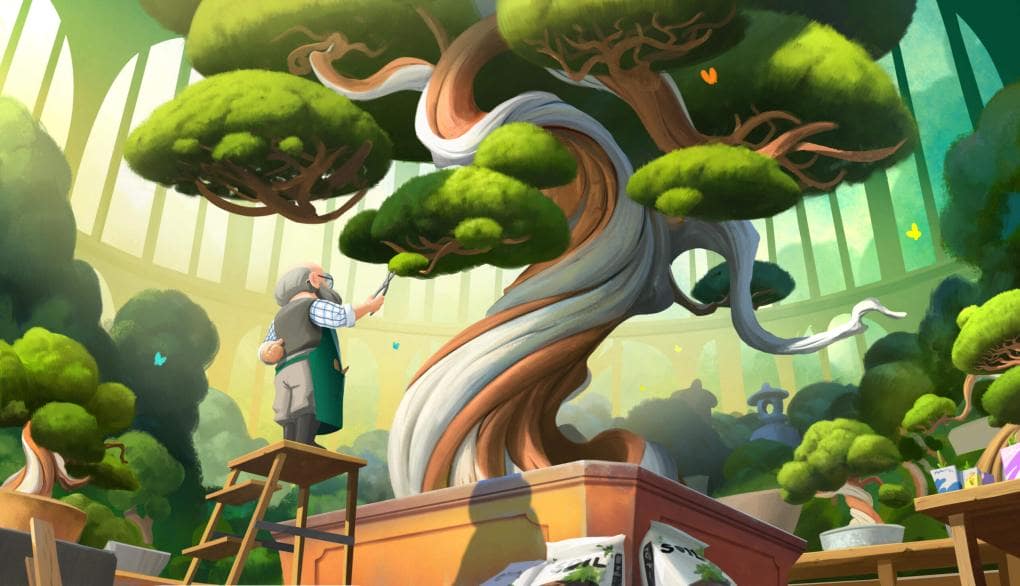
I always go through the same process: The first step is figuring out what I want to learn or the skills I want to expand on. Then I look for concept art that could challenge me to build a storytelling composition in a single still frame. That’s how my version of Bonsai Garden came to life.
At the time, I wanted to refine my sculpting skills and my ability to create vegetation. The concept art by Veikka Somerma, Tenkai-en Bonsai Gardens, immediately caught my attention with its beautiful colors, peaceful setting, and significant number of indoor plants.
Tenkai-en Bonsai Gardens, by Veikka Somerma
Having the concept on hand leads to one of the most crucial parts of the process – gathering references. I usually start small with a couple of pictures per asset and grow my library as I go through modeling and texturing.
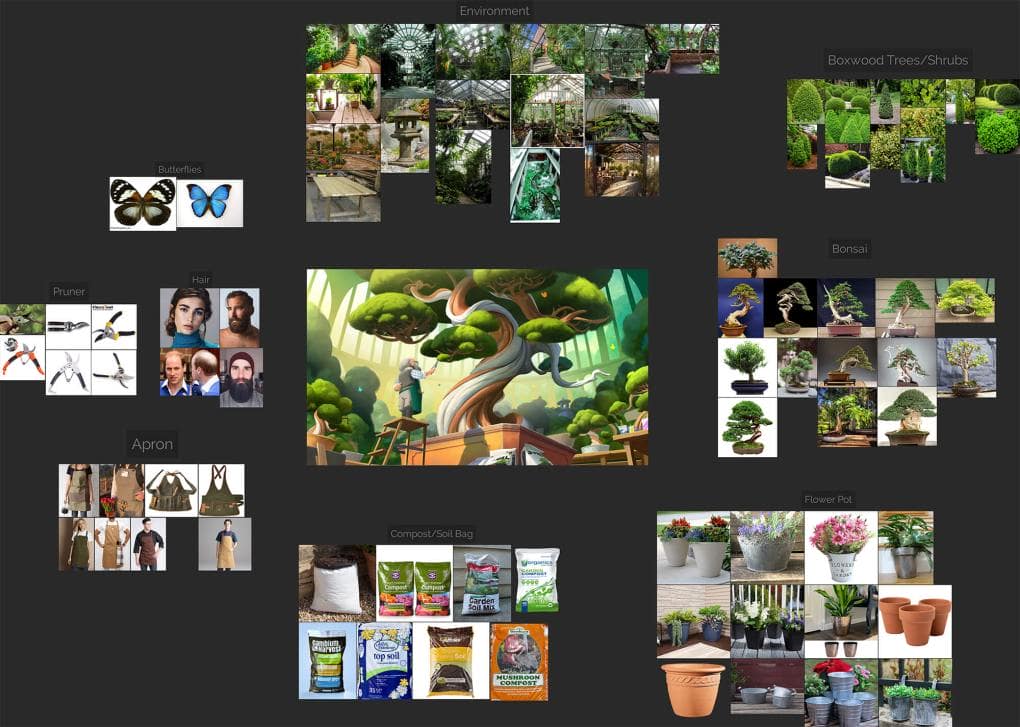
Board of references used for Bonsai Garden
The development process of Bonsai Garden
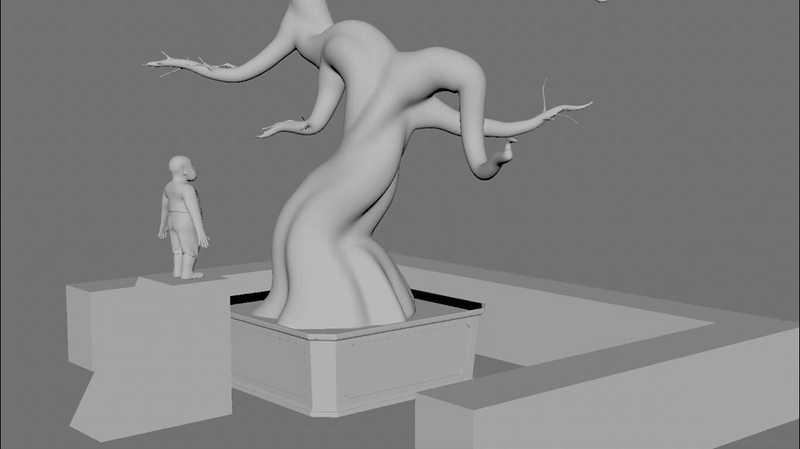
Once I’ve collected my references, I start blocking out my scene and the camera. This involves simple shapes for quick adjustments. However, you’ll notice that the hero assets are already a little more complex. I start with the most important assets early on, which lets me iterate more on those before the deadline. Blocking out the camera angle and the surrounding scene is a great help.
We’d love to know more about the trees.
There are two types of trees: the background fill and the hero trees. Since they fulfill two different roles within the piece, I approach them differently.
For the background trees, their exact look is less important than their general shape. This is where SpeedTree’s randomization tool comes in handy. One of the most powerful features of SpeedTree is its ability to generate infinite variations of the same tree. This way, the artist can spend time working on building or perfecting the look of a single tree, and then with one click, create different versions of it to scatter within a scene, building organic diversity.
This was particularly helpful for my piece. After getting the look of the bushes just right, I was able to create 5–10 iterations of each to scatter around the scene.
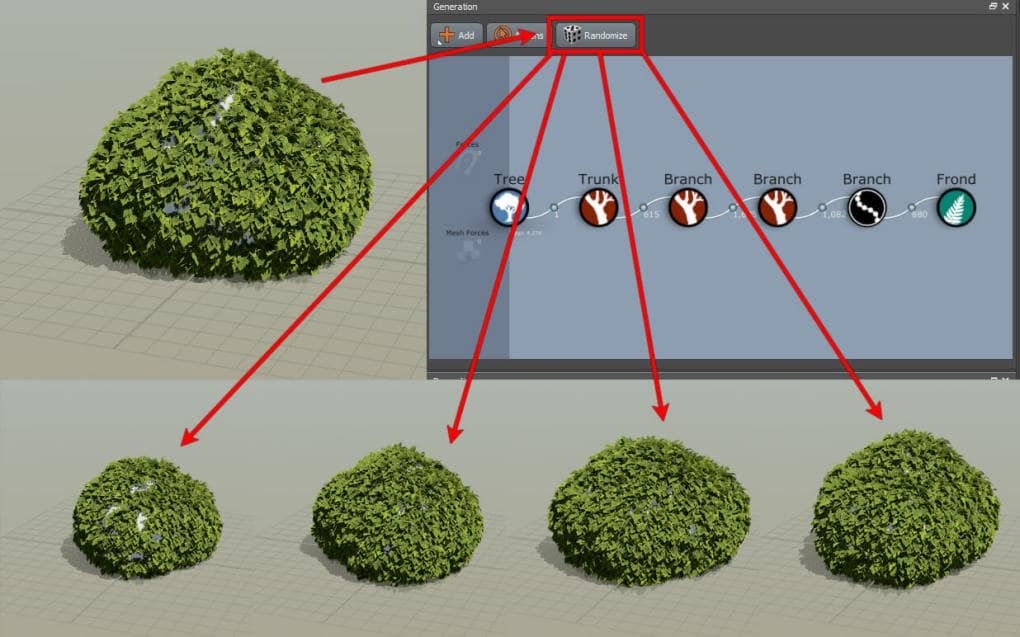
Randomized iterations of bush model
I required many different stylized trees to fill in the scene, but I also needed specifically shaped trees that would match the concept art. Because using the randomization feature comes at the cost of precise art direction, I had to take another approach when it came to the hero assets.
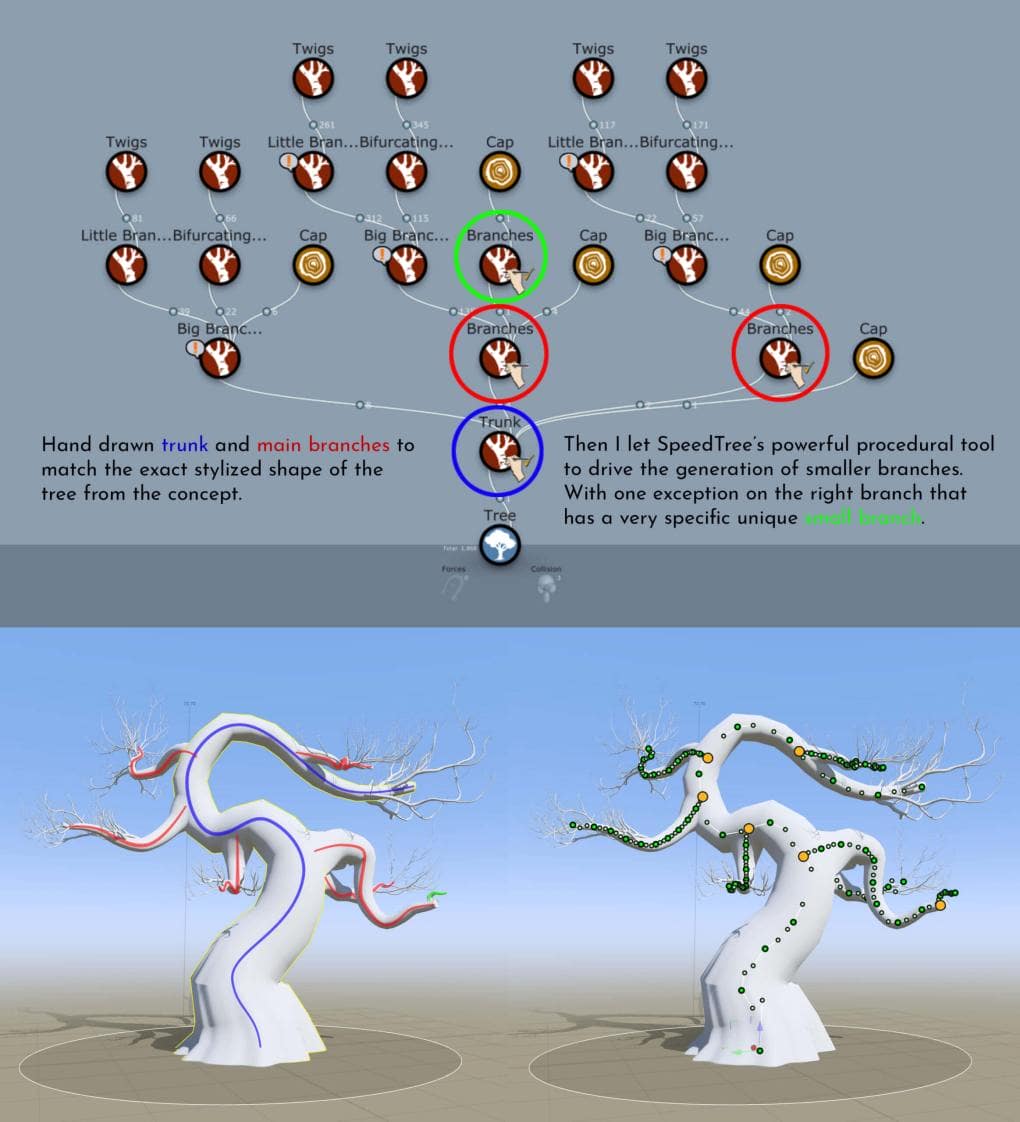
The hand drawn trunk and main branches match the stylized shape from the concept art, while SpeedTree’s procedural generators drive the generation of smaller branches.
While I could’ve spent time sculpting the trees from the ground up – maintaining full creative control throughout the whole process – that would have taken me ages. I am a huge advocate for working smarter, not harder, so I decided to make the most of SpeedTree before having to put in manual labor. This is where SpeedTree’s hand drawing tool fits perfectly into my workflow.
With a curve, I can drive the shape of my main trunk to be exactly the way I need it to be. I also give it some organic wobbles, branches, and touches that any tree would have.
With that low-poly tree base ready, I am able to sculpt on top to push the forms further (for their intertwined look), and then reshape the small branches to my liking. With the more detailed model, I projection-paint bark displacement maps from Megascans in Mari to get the finer surface details. Then I use both mesh maps and displacement maps to procedurally create the shader for the tree and drive the color. I add a couple of custom hand-painted masks for the white and brown bark separation.

Development of Hero tree asset
Once I have my tree trunk fully figured out, I need to give it actual foliage. In comes another great tool from SpeedTree: the ability to grow things onto an imported mesh. For my approach to the trees, this comes with several great advantages.
While I could have reimported my sculpted tree and started growing smaller branches and leaves from my secondary branches, which would have given me a more realistic and organic look, it would have made it harder to control the shape of the foliage as a whole. Instead, I decided to sculpt some blocked-out pieces of geo to the exact shape I envisioned for the foliage, and then grew the leaves on that surface.
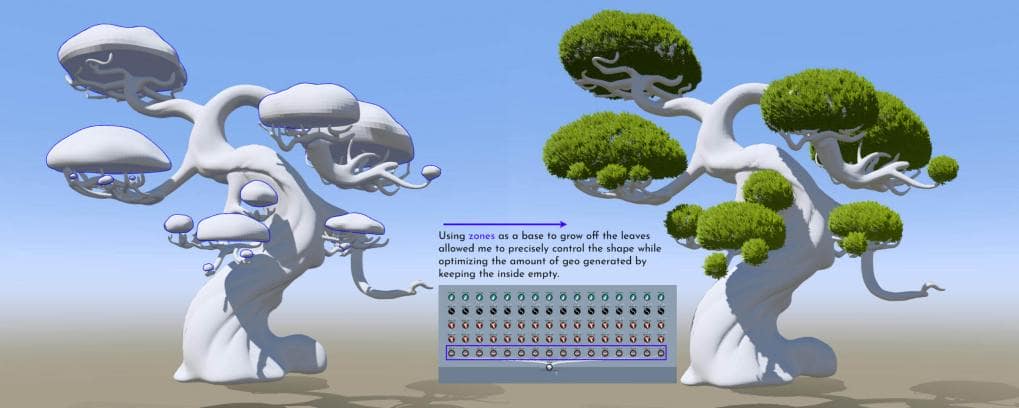
Demonstration of growing leaf mesh instances onto mesh zones
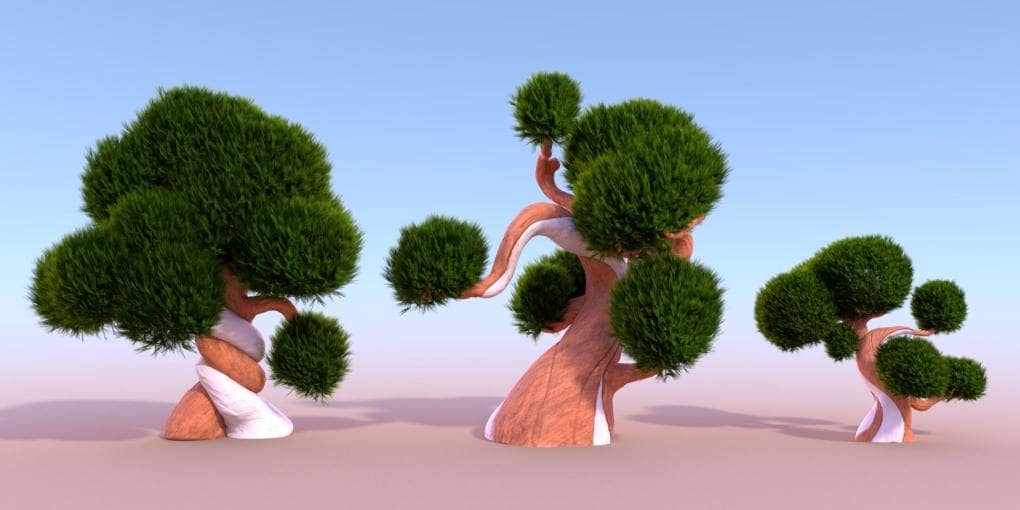
Other hero assets built using the workflow
This way, I exert full control over the stylized shape, and, even with a high density, the asset still performs well as the foliage remains hollow in the middle.
Once I figured out that workflow, it became fairly easy to reiterate the process for the three other hero trees in the scene.
After I finish modeling and texturing the scene, I finally turn to the lighting and compositing portion of the project (the most enjoyable part of the process for me). The densely foliated atmosphere adds to the indoor lighting, really opening up the possibilities of the scene.
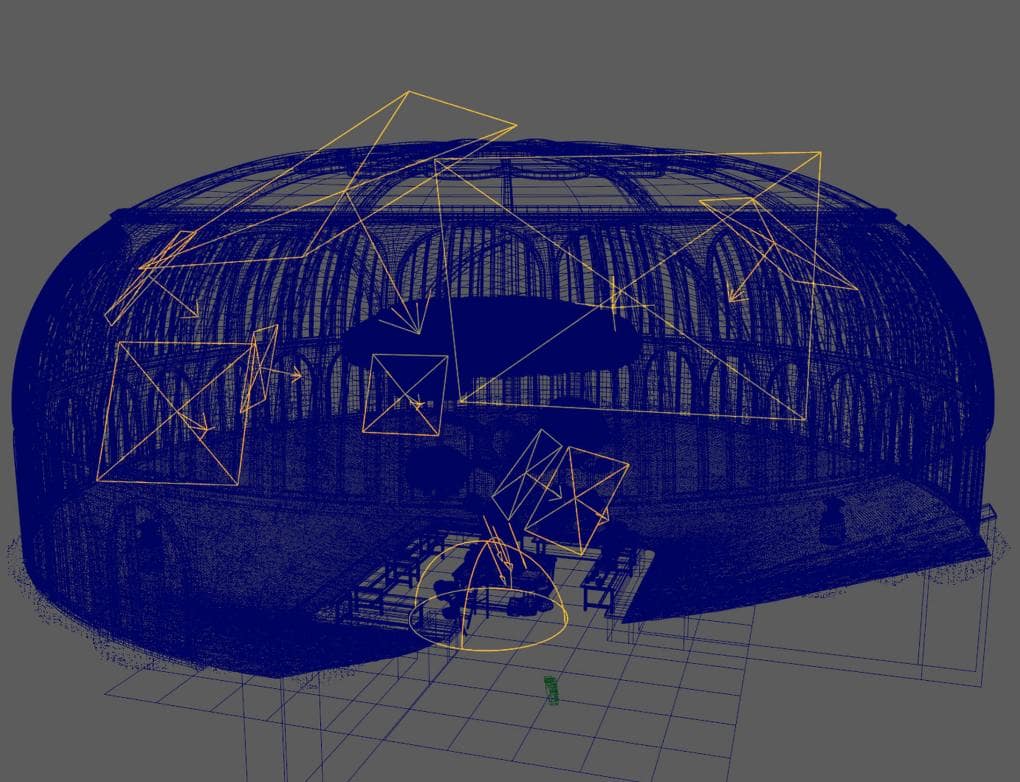
A wireframe view of the scene
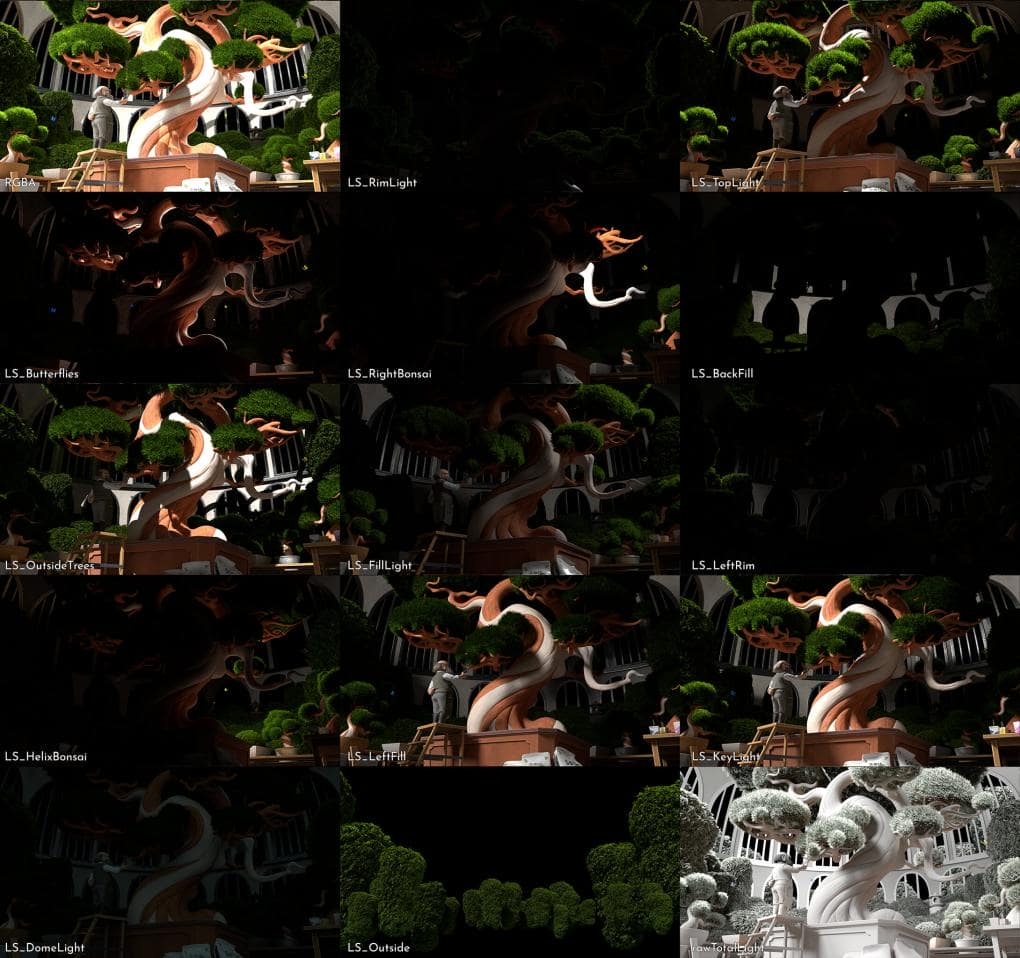
Knowing that I’d do the compositing allowed me to think ahead and plan my lighting accordingly. This led me to use 13 lights to hit precise parts of the piece without worrying too much about how it would impact the overall environment; I knew I could then suppress the effect of lights with Cryptomattes in Nuke.
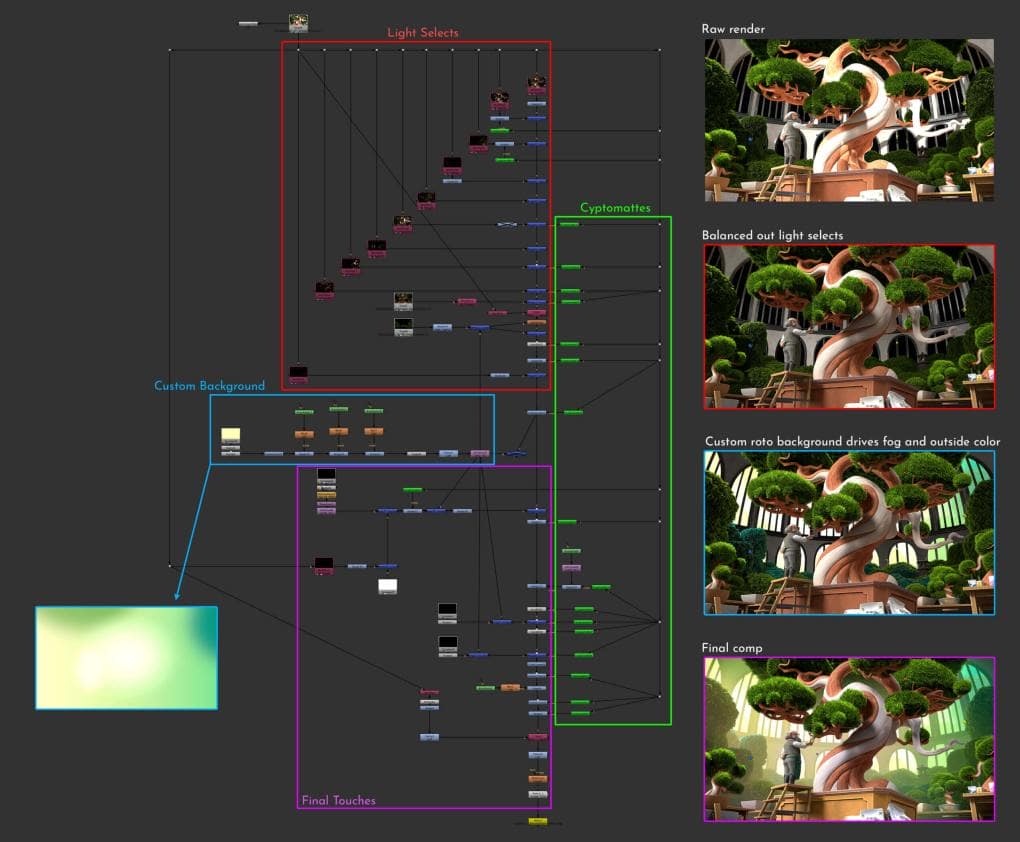
A look at Thomas’s lighting process in Nuke
Compositing this scene was a major learning experience for me. I was significantly helped and guided by my mentor, Miguel Ortega, as it was my first “big” project and my first time dealing with Light Selects. He showed me how to composite them into the final piece.
Overall, the techniques and core concepts are pretty simple. The idea is to make sure the luminance values have high enough contrast throughout the piece to be read clearly. This is achieved through color correction and grade nodes assisted by Cryptomattes. To get closer to the concept’s painterly feeling, I used a combination of Roto shapes to create a custom-colored background emulating the concept art’s colors, which I then used to drive various nodes, especially in the fog.
Layers composited to create the final image
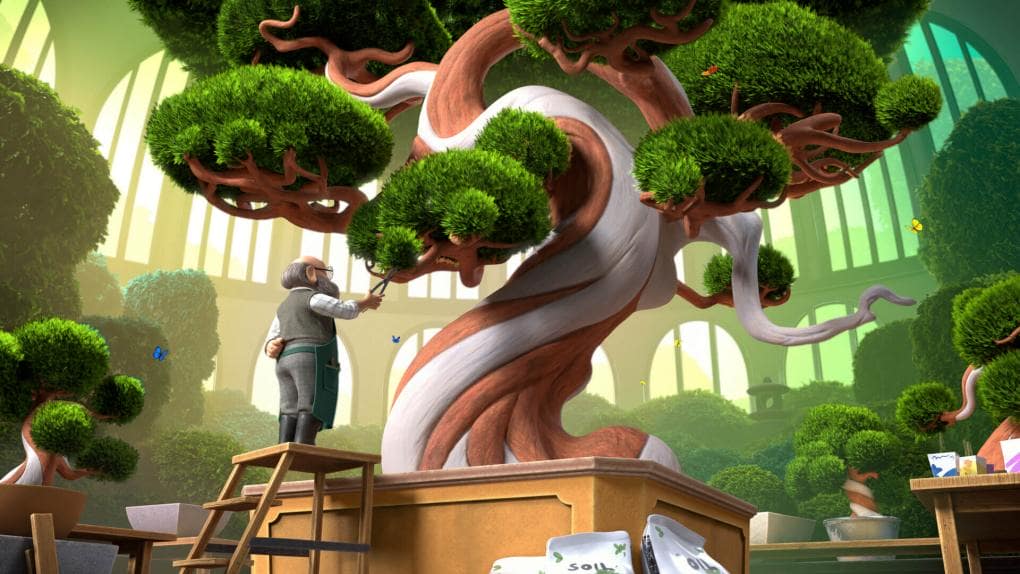
Finished composite image of Bonsai Garden
With the piece complete, I reflect on what I could do better or differently. To me, the area that is the most underwhelming is the texturing side of the trunks – it’s lacking in complexity. I need to spend more time creating more breakups in the shader, be it roughness or color. I also think that the displacement is too subtle. I was not all that savvy with displacement maps at the time, so I went through some unnecessary steps that ultimately brought down the overall quality of the displacement. What happened here was a case of bad time management. In the future, I should divide my time better between modeling and texturing rather than spending it mostly on modeling.
Another improvement would be incorporating smaller branches on the trees that bare the foliage. The ones generated by SpeedTree are great so, instead of getting rid of them altogether and making my own stylized ones, I’d seek out a compromise where both the procedural generation from SpeedTree and my sculpted branches could work together. Here, the price for a fully stylized look came at the cost of its “organicness” which shouldn’t have happened. But as one of my mentors always says, “It is never done, only due.”
I am content with the result. In the end, I learned and grew throughout the entire process and, to me, my initial challenges were successfully completed.
What do you wish you knew when you first started learning 3D?
The best advice I could give my younger self is to not be afraid to learn new software. Artistic and technical skills are transferable.
The very first time I attempted to learn 3D, about 10 years ago, I started with Blender as it was free. But soon after, I realized that this was not the industry-standard software, so I gave up. I told myself that learning Blender would be a waste of time as I would have to relearn everything anyway. Because I had already gone through the basics of Blender, I never found the motivation to do it again with Maya until years later when I joined Gnomon.
My failure to understand, early on, that the software does not define the artist is what I consider my biggest mistake. I wasted years that should have been spent playing around and learning the ins and outs of 3D. Now, this has become one of my main motivations for taking on personal projects; learning new software and techniques. This makes you a more versatile and future-proof artist.
Are there any upcoming endeavors on the horizon? What do you plan on learning next?
I’m focused on doing character work, particularly the development of character appearances. I am trying to hone in on my ability to create skin, clothes, and grooms. This is the perfect opportunity for me to finally pick up RenderMan and keep on exploring Houdini (especially for grooming purposes).
Is there anything else you’d like to add before we wrap up?
I want to thank Veikka Somerma for his original art; Bonsai Garden would have never seen the light of day without his artwork. Please go check him out because he is an amazing concept designer and illustrator!